Wednesday 31 August 2011

Tutorial #1: Everyday Pin-Up

Hey everyone!

So I was playing around a bit and came up with a great everyday, sort of pin up inspired look that can work in pretty much any season!

A lot of women get freaked out at the idea of a red lip, and even more so when they contemplate it for everyday wear. This look solves that problem, and also answers the question of "Well great I have red lips; now what do I do with my eyes???".

Enjoy!


Step 1: Prime your face with your favourite face primer, and prime the eyes as well. I used the Gosh Classic Face Primer, and on my eyes, MAC paint in "Untitled"

** For the eyes, all the colours I used come from the Sephora Colorista Palette, but I do have alternative shadows and descriptions listed with each step. All colours are neutral, so they shouldn't be too hard to find :)**

Step 2: Using a shimmery white shadow and a stiff shader brush, go over the entire lid area, staying away from the crease. MAC shadow in "Crystal Avalanche" works really well for this. You don't need a lot, just enough so that the light catches the look of that shimmer to open the eye area.

Step 3: Take a matte, medium brown eye shadow and an angled fluffy crease brush, go in with the colour to define the outer v as well as a little bit in the crease. This will create a bit of definition to the eyes, without being overwhelming next to the red lip we're gonna be wearing. MAC shadow in "Wedge" works great for this step :).

Step 4: Using a small eyeliner brush, take a matte black shadow, such as MAC "Carbon" and line just the outer 1/3 or 1/2 of the top lash line, winging out slightly at the outer corner of the eye. For this, you want to use short smudgy motions so that the line isn't too stark against the light shadow you applied to the lid.

Step 5: Take what's left on that small liner brush, and smudge it on the very outer part of the lower lash line. This will bring out the overall shape of your eye without being overwhelming.

Step 6: Line the lower waterline with a silver or white waterproof liner, such as the Sephora Waterproof Eye Pencil in "Silver"

Step 7: Apply 2 coats of black lengthening mascara to top lashes. I used CoverGirl Lash Blast Length Waterproof


** Now you're all ready to do the rest of your face!**

Step 8: Apply your favourite foundation to your entire face, and concealer where needed. I used Bare Minerals foundation in Light.

Step 9: Using a big fluffy blush brush, apply a rosy or even brick coloured blush to the apples of the cheeks, blending out over the cheekbones in circular motions. Make sure you flick any excess off the brush to avoid applying too much colour; you just want a nice flush to the cheeks, nothing crazy!

Step 10: Apply your favourite cheek highlighter to the tops of the cheekbones.

** Now it's time for the lips!**

Step 11: Take your favourite red lip colour (I used MAC Viva Glam I, which is a really nice neutral red so it's not too overpowering). Apply this by dabbing it on the lips, then using your ring finger, blend it together to make it all smooth. This keeps the red colour from being too overwhelming, but you still get a gorgeous colour from it.

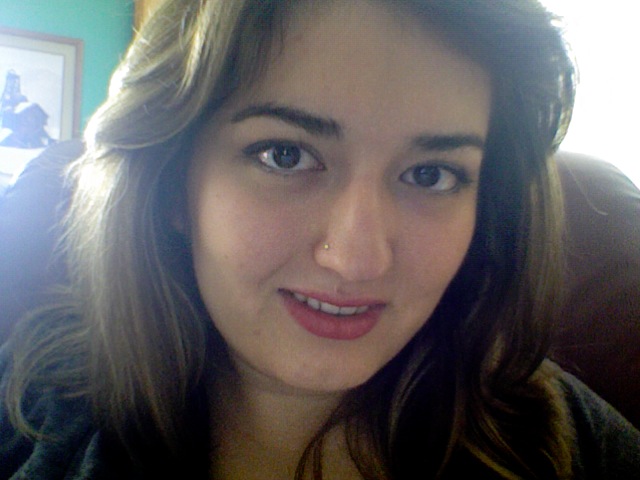
And there you go! You now have a wearable, pin up inspired look for day time!

Thanks for reading! Hope you enjoy this look!

xox

Anita :)

Thursday 11 August 2011

Review: The Body Shop Big and Curvy Mascara (Non-Waterproof)


EEEEEE!!! IT'S MY FIRST REVIEW SOOOO EXCITED!!! Erm, yes ok. So, for my first review I decided to do something a bit different, with a product that hasn't gotten too much press, The Body Shop's Big and Curvy Mascara. Now, one might think that mascara is a fairly straightforward thing, and I suppose you would be right in some cases, but for me personally, I find it very tricky to find a mascara that does ANYTHING to my lashes. I am half Indian, so my lashes are already quite dark and thick as is (not bragging, this is actually annoying!). Anywho, I think I have just found an amazing mascara! Here's a picture of me with the mascara on:


As you can see, it isn't SUPER dramatic, but it is most definitely there! This mascara is amazing. It separates each of my lashes, lengthens them, and even makes them look thicker! It adds drama, without being obnoxious, which to me, is super important for an everyday mascara. 

I think my favourite thing about this product is the wand. All too often now with mascaras that seem to promise 400 MILLION TIMES the lashes, that seems to automatically mean you get a wand the size of your face, resulting in many a poked eye. Somehow, The Body Shop has been able to come up with a formula that provides volume and length, and still give us a wand small enough to get to each lash, on both the upper AND lower lashlines! (Which by the way is a fabulous way to really open up the eye area).

Now, with all this ranting and raving about how awesome this product is, you may think I have nothing bad to say about it. 

Wrong.

There are a couple of things about this product I'm not crazy about. The first thing is the smell. For whatever reason this stuff smells like mud. I wouldn't say that it's super noticeable when you have it on, but when you open the tube, it definitely is there. 

The second thing I'm not thrilled with is the price. As a contact lens wearer, I have to be especially careful to replace my mascara fairly often. No one wants little critters living in their mascara wand. Having said that, this mascara retails for about 18 bucks, which I think is a tad expensive. For 18 bucks, I expect a bit more drama than what this mascara delivers.

Overall, I would recommend this mascara. It's great for everyday, easy to use, comes from a company that doesn't test on animals, and is also available in the ever elusive brown, great for those who can't quite pull off darker mascaras.

Thanks for reading! Happy beautifying!

- Anita :)


The Body Shop Big and Curvy Mascara

Ease of use: 5 / 5 
Accessibility: 4 / 5
Price: 3 / 5 
Quality: 4.5 / 5

Overall:

 out of 5


Hello Everyone!

My name is Anita, and I am starting this blog as a way to give honest, unfiltered reviews and advice about hair and makeup products. I am absolutely in love with playing with makeup, and am always on the hunt for the next great product and trend, so I thought I would keep a blog to tell people about my findings. Roughly every week I will have a new product review or tutorial using hair and makeup products ranging from high end brands, to drug store finds. Hope you enjoy it!

Fun fact, the oleander flower is actually a symbol for beauty!

Anita <3